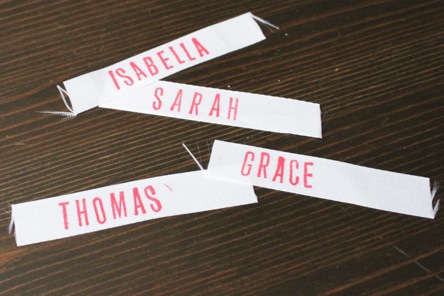
I saw this idea a few weeks ago on Martha Stewart and knew I wanted to try it. My boys need to have their names inside of their coats for preschool, but I hate writing it in marker because it looks terrible when I do that. Plus I don’t want my younger son to always have his brother’s name in his coat (although he is growing so fast I think the hand-me-downs are going to start going in the opposite direction soon).
With this idea, you get a nice looking name label that you can just cut out of a garment when you want to pass it on or donate it. This is a really nice touch for handmade items too. After you spend so much time and put so much love into your handmade items, it would be a shame if they got lost or misplaced. I hope you will find this tip useful!
Supplies
- Alphabet Stamps (clear stamps may be easier to use than what I have pictured)
- Tulip Soft Fabric Paint
- Cosmetic Sponge (or similar craft sponge)
- Twill tape wider than the height of you alphabet stamp letters
- Scissors
Instructions

Step 1: Cut a length of twill tape long enough to stamp your name, plus a little extra to turn under and sew. Press the twill tape smooth with an iron if necessary.

Step 2: Select the letters you need. The paint dries quickly so you will want to have your letters ready to go before making your stamp pad.

Step 3: Squeeze a little paint into the center of your sponge.

Step 4: Squish the paint into the sponge.

Step 5: Now you have a fabric ink stamp pad.

Step 6: Blot your stamp into the ink pad.

Step 7: Stamp your letter on the twill tape. Like I said, this may be easier with clear stamps so that you can see exactly where you are stamping. I still need a little more practice keeping mine straight.

Step 8: Repeat steps 6 and 7 for the rest of your letters.

Step 9: Allow the paint to dry. Then make sure you heat set the paint, following the instructions on your paint container.

Step 10: Fold the ends of the twill tape under and stitch down both cut sides. If you are sewing this in a hat, I would place the tag in the back and up high enough that it won’t rub on any little necks.










This would be awesome for shop name tags!
That is a great idea! You could have a custom stamp made and just stamp it once.
I actually ordered a custom stamp from MyRubberStamps, It has a ball of yarn and crochet needles in the middle and around it says “Hand Crocheted by The Fancy Hooker” I can’t wait to get it! I ordered special ink but this looks like it would be easier and cheaper!
Sounds cute! I would love to see it if you try this.
Your tips and tricks sections is sooo great!! I found this blog called patchworkpottery.blogspot.com and she has a great idea on making WASHABLE fabric labels using twill bias tape, and iron on transfer. It looks sooo easy and you can make a number of labels at once! I just can’t say enough about this keen idea!
Love this idea. I make knitted and crochet items for gifts and to sell.
This is an awesome idea, to make them in packs of different quantities for parents to label school items, so they DO come ‘home’.
I do love the set of stamps you have pictured here.
Can you please give me a place where I can buy these……
Love your website and all the helpful, tips and tricks.
Thanks for Sharing
Thanks, Bec. I bought my stamps at JoAnn’s. Here’s a link: http://www.joann.com/creative-caf-little-classic-rubber-stamp-set-casual-alphabet-set/xprd1057050/